corn bread on an alcohol stove
I really like the Caldera Cone Tri-Ti Stove and Windscreen. Its great for cooking meals, heating water, and frying fish. I wanted to add baked breads and biscuits to our meals, so I got an Outback Oven and began experimenting with its use with the Tri-Ti Caldera Cone. The Outback Oven, ultralight version, comes with a thermometer, so all one has to do is control the heat output so the thermometer stays in the BAKE range, and out of the BURN range. It took some experimenting, but I finally got it to work in a reliable manner. The ultralite version also comes with a scorch buster, and a heat reflector that goes over the stove, and an insulated cap that goes over the pot.
I made some simmer rings for the Caldera stove, which stops down the size of the flame. These have the desirable effect of also making the stove go a lot longer on a charge of fuel. I had a hole size that was a little too small, then one that was a little too large, and one in between them was about right. I could fire up the stove and it would be in the right temperature range until the fuel ran out, and that was also when the bread was cooked.
The almost perfect hole size is 17 mm, or 11/16 in in diameter. The simmer ring is cut from the bottom of a pop can, and covers the hole in the top of the stove. Another useful size, if you need to stop down the heat output even further, is 14 mm, 36/64". Trail Designs now has a simmer ring that works very well which they sell.

Today I made biscuits from a Bisquick Complete Biscuit mix. I measured 1 cup of mix with water till it was mixed up thick, not pourable. Then I assembled the stove and oven:

This is the stove and simmer ring. On top of the stove goes the reflector plate, which directs heat up, and keeps the fuel tank cool.

Next the windscreen, with the scorch buster from the Outback Oven attached, goes over the stove.
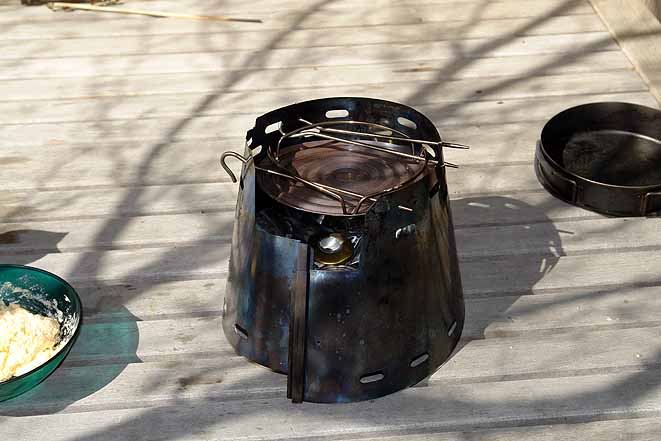
The scorch buster is held in place by the stakes that come with the Caldera, and suspend the scorch buster below the bottom of the pot.

Next a square of parchment paper goes in the pot, with the biscuit mix placed in the parchment paper. I cut off the edges that stick up, or one could cut it into a circle at home. The parchment paper makes the pot come out perfectly clean.

This is the stove, pot, lid on the pot, and thermometer sitting on top of the lid, ready to put the insulated cap on, and fire up the stove.

There is a hole in the top of the insulated cap, and you can see the thermometer through the hole. I fold in the rubber coated handles on the pot and fry pan lid, and they seem to be OK in the heat of the oven. You need a handkerchief or other cloth to touch the handles or thermometer. You need to rotate the hot cap periodically in case there is a hot spot that starts to burn it. I keep the handles on the opposite side as the opening in the windscreen, because a lot of heat comes out there.

This is the corn bread came out. It was a little browned on the bottom, and perfectly cooked all the way through. It was 30 minutes from starting the stove, to opening the pot to take out the biscuit.